
Prerequisites Checklist
Before you start, confirm these three items:
| Item | What you need | Where to get it |
|---|---|---|
| A Zapier account | Free tier is enough for this smoke test — one two-step Zap. | zapier.com/sign-up |
| Admin access in Standard Time® | Rights to open the Tools ribbon's Integration dropdown. | Your existing login — no special permission beyond normal admin access. |
| Site URL and Customer ID | The values used to connect Zapier to your account. | Both come from the URL you use to reach Standard Time® — e.g. https://stcloud67.com/?cid=1000. See the callout below for how to split it into the two values. |
Finding your Site URL and Customer ID: Look at the URL you use to open Standard Time® in your browser — it looks like
https://stcloud67.com/?cid=1000. The Site URL is everything up to and including the domain (https://stcloud67.com). The Customer ID is just the value after ?cid= — in this example, 1000. (Real CIDs are usually longer alphanumeric strings; 1000 is shown here only as a placeholder.) If you don't see ?cid= in your address bar, check Help → About inside Standard Time® instead.
Want the full feature overview first? This guide is a hands-on smoke test. For the complete picture — all 11 record types, automation ideas, and when to use Zapier versus other integrations — see the Zapier Integration guide.
Step 1 — Generate Your Zapier API Key
Zapier authenticates to your Standard Time® account with three values: Site URL, Customer ID, and an API Key you generate once inside the app.
-
Open the Tools ribbon → Integration dropdown → Zapier API Key.
In the top ribbon, click the Tools tab. In the Integration panel, click the Integration dropdown and choose Zapier API Key.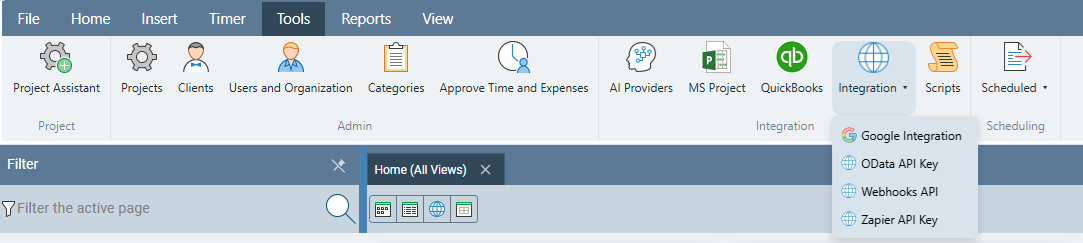
-
Generate a new key and copy it immediately.
Click Generate New Key. The full key is shown only once — copy it now. You'll paste it into Zapier's "Connect Account" screen in Step 3.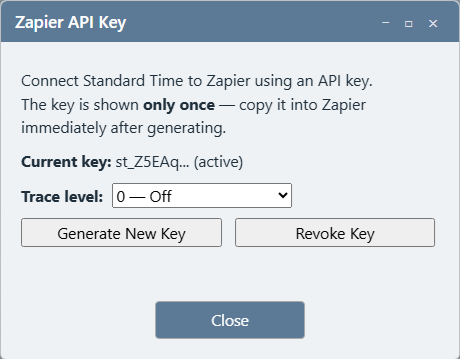
Turn on tracing while you test: Set Trace level to 3 — All in this dialog for the duration of the smoke test. If a step behaves unexpectedly, this gives you a detailed log of exactly what Zapier sent. Set it back to 0 — Off once you're confident the connection works.
Step 2 — Create a New Zap on zapier.com
-
Log in to zapier.com.
Go to https://zapier.com and sign in, or create a free account if you don't have one yet. -
Click Create Zap.
From the Zapier dashboard, click the + Create button (or Create Zap) in the top-left corner. A blank Zap editor opens with an empty Trigger step. -
Name the Zap.
Click the title at the top of the editor (usually "Untitled Zap") and rename it to something recognizable, such as ST Smoke Test. This has no functional effect — it just keeps your Zaps list organized.
Step 3 — Connect Your Standard Time® Account
-
Search for "Standard Time" as the trigger app.
In the Trigger step's app search box, type Standard Time and select it from the results. -
Choose "Sign in" to connect a new account.
If this is your first Zap with Standard Time®, Zapier prompts you to connect an account. Click Sign in. -
Fill in Site URL, Customer ID, and API Key.
A popup asks for the three values. Split them from the URL you use to open Standard Time® — e.g.https://stcloud67.com/?cid=1000becomes Site URLhttps://stcloud67.comand Customer ID1000. Paste in the API Key you copied in Step 1. Click Yes, Continue. -
Confirm the connection succeeded.
Zapier calls Standard Time®'s auth-test endpoint to verify the credentials. If successful, the account appears in the picker labeled by your Site URL. If it fails, see Troubleshooting below.
Step 4 — Configure the Trigger: New Project
-
Choose the trigger event.
In the Trigger Event dropdown, select New Project. Click Continue. -
Select your connected account.
Confirm the Standard Time® account you connected in Step 3 is selected, then click Continue. -
Test the trigger.
Click Test trigger. Zapier fetches a recent project from your account to use as sample data for the next step. If your account has no projects yet, Standard Time® returns a static sample record instead, so this step succeeds either way. -
Review the sample fields.
Zapier shows a record with fields likeProjectID,ProjectName,ClientID, andStatus. These are what you'll map into the action step next.
Step 5 — Add the Action: Create Time Log
-
Click the + button below the trigger step.
This adds a new, empty Action step to the Zap. -
Search for "Standard Time" again as the action app.
Type Standard Time in the app search box and select it — the same app can be both the trigger and the action in one Zap. -
Choose the action event.
In the Action Event dropdown, select Create Time Log. Click Continue, then confirm the same connected account. -
Map the required field.
ProjectIdis required. Click into that field and choose theProjectIDvalue from Step 4's trigger output — Zapier shows it as an insertable field from the "1. New Project" step. -
Fill in a few optional fields for a clear test record.
SetDurationHoursto0.5andDescriptiontoZapier smoke testso the resulting Time Log is easy to recognize and delete afterward. Leave everything else blank — Standard Time® fills in sensible defaults.

ProjectID output maps directly into the action's required ProjectId input — everything else can be static test values.Step 6 — Test Each Step and Publish
-
Click Test step on the action.
Zapier sends the mapped data to Standard Time®'sCreateTimeLogendpoint and shows the response — a new Time Log record with anid, the mappedProjectId, and your test description.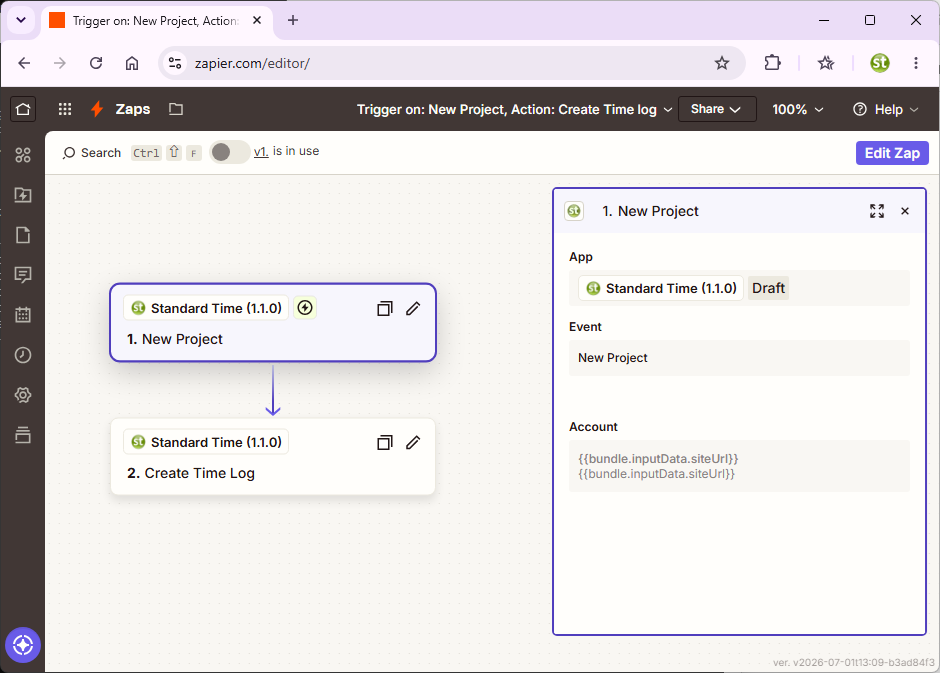
-
Publish the Zap.
Click Publish (or toggle the Zap to ON). The Zap now runs automatically whenever a new project is created in Standard Time®.
The test step creates a real record: Clicking Test step on the action actually calls
CreateTimeLog — it is not a dry run. Open Standard Time®'s Time Logs grid afterward and delete the test entry (look for the Zapier smoke test description) if you don't want it in your data.
Step 7 — Verify End-to-End
The test step in Step 6 confirms the action works in isolation. This step confirms the whole loop — a real event in Standard Time® flowing through Zapier and back — works too.
-
Save a brand-new project in Standard Time®.
Any name works. Do this inside the Standard Time® app itself, not through Zapier. -
Watch the Zap history on zapier.com.
Go to your Zap's Zap History tab. Because Standard Time® uses Zapier's REST Hook pattern, delivery is near-instant — a new run should appear within a few seconds, not on a polling delay. -
Confirm the run succeeded.
Click the run to see the trigger's input (your new project) and the action's output (the newly created Time Log). -
Check Standard Time®'s Time Logs grid.
A new Time Log entry should be visible, linked to the project you just created, with the descriptionZapier smoke testand a duration of0.5hours.
Smoke test passed if: Step 6's manual test created a Time Log, and Step 7's real project save triggered a second Time Log automatically — proving both the manual path and the live, event-driven path work end to end.
Troubleshooting
Connecting the account fails
Symptoms: Zapier shows an error immediately after clicking "Yes, Continue" on the connect-account popup.
Causes and fixes:
Causes and fixes:
- Site URL must include
https://and no trailing slash — e.g.https://stcloud67.com, notstcloud67.com/. - API key not copied correctly — regenerate it in the Zapier API Key dialog and paste it fresh, watching for accidental leading or trailing spaces.
- Customer ID mismatch — double-check it against Help → About inside Standard Time®.
Trigger test returns no useful data
Symptom: "Test trigger" succeeds but the sample record's fields look generic or unfamiliar.
Fix: This is expected on a brand-new account — Standard Time® falls back to a static sample record when no real project exists yet. The field names and types are still accurate for mapping purposes; create a real project first if you want to test against actual data.
Fix: This is expected on a brand-new account — Standard Time® falls back to a static sample record when no real project exists yet. The field names and types are still accurate for mapping purposes; create a real project first if you want to test against actual data.
Action step fails with a validation error
Symptoms: "Test step" on the Create Time Log action returns an error instead of a new record.
Causes and fixes:
Causes and fixes:
ProjectIdis required — confirm it's mapped to the trigger'sProjectIDoutput and not left blank.- Make sure you mapped the field from the correct step — Zapier can show multiple "ProjectID"-looking fields if you have other steps in the Zap.
- Set the Zapier API Key dialog's Trace level to 3 — All (see Step 1) and check the Standard Time® Zapier debug log for the exact request that failed.
Step 7 never fires after saving a project
Symptom: The Zap worked in Step 6's manual test, but a real project save doesn't trigger a run.
Fix: Confirm the Zap is actually published (toggled ON, not left in draft/off state). Also confirm you saved a new project — the
Fix: Confirm the Zap is actually published (toggled ON, not left in draft/off state). Also confirm you saved a new project — the
New Project trigger fires on creation only, not on edits to an existing project.
Next Steps — All Zapier & Integration Guides
Your Zapier connection is confirmed both ways. From here you can build Zaps for any of the 11 record types, chain in other apps, and explore Standard Time®'s other integrations.
Related FAQ: For common questions about Zapier, API keys, and other integrations, see the Integrations & Data FAQ.