What the Start Here Card Is
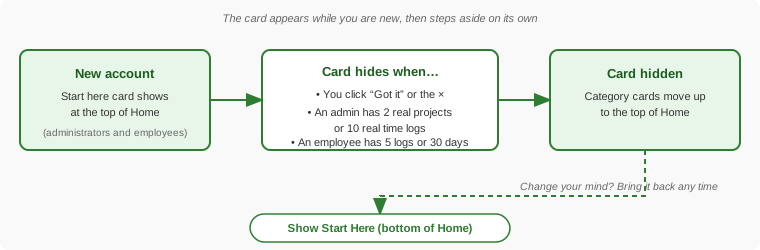
The Home screen normally shows a grid of category cards (Project Management, Time Tracking, Barcodes, and so on — see the Home Screen Icons Guide). That is a lot to take in on day one. So while your account is new, Standard Time® adds one extra card above the grid with a single suggestion: do this first.
The suggestion depends on who you are. An administrator is pointed at creating a first job. An employee is pointed at the screen they will use most, such as the Timesheet or Time Logs.
What's on the Card
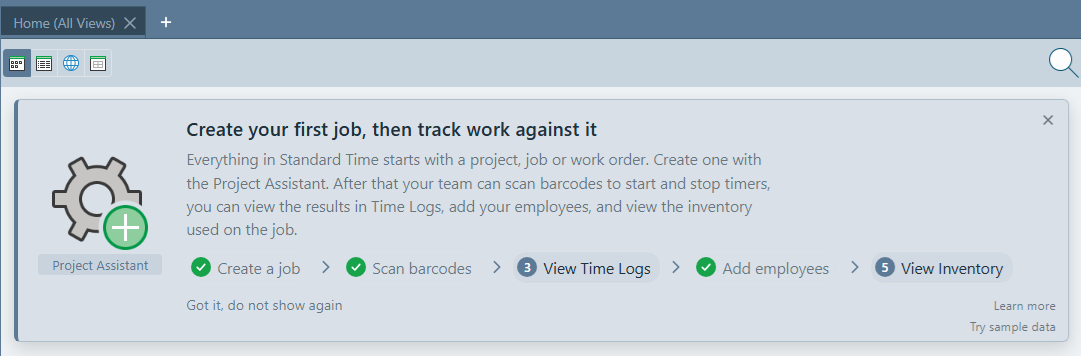
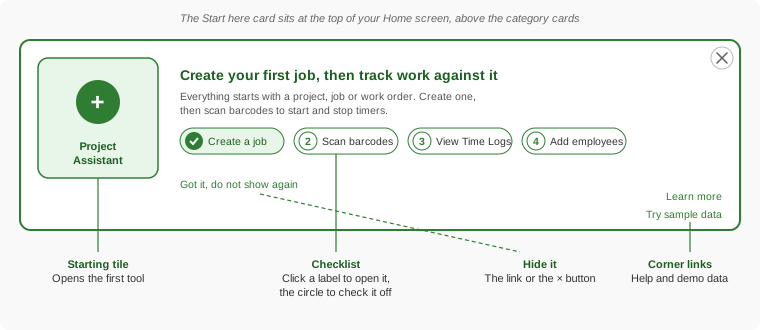
- Starting tile — a copy of the Home icon you should open first. Click it exactly as you would click it in the grid.
- Headline and intro — one sentence on what to do and why.
- Numbered steps — a short row of the next things to try. Click a step's label to open that screen. For an administrator the steps are a real checklist: the number circle becomes a check mark when the step is done. Create a job, Scan barcodes, and Add employees tick themselves off once Standard Time® sees that it has happened. The others you can check off yourself by clicking the circle, and you can click a ticked circle again to undo it.
- Learn more — opens this Learning Center in a new browser tab.
- Try sample data — administrators only. Opens the sample data window described below.
- Got it, do not show again and the × button — both hide the card.
What Each Person Sees
The card picks the first row below that matches you and whose starting tile is actually on your Home screen. Administrators who also hold the right to create jobs and projects get the first row; everyone else (employees, and administrators with that right removed) gets the first employee row that applies.
| Who | Headline | Steps shown |
|---|---|---|
| Administrator | Create your first job, then track work against it | Create a job → Scan barcodes → View Time Logs → Add employees → View Inventory |
| Employee who uses the Timesheet | Enter your hours in the Timesheet | Enter your hours → Review in Time Logs → Add expenses → Request time off |
| Employee who uses Time Logs | Enter your hours in Time Logs | Enter your hours → Add expenses → Request time off → Or scan barcodes |
| Employee who enters expenses | Enter your expenses | Enter your expenses → Request time off → Or scan barcodes |
| Employee who can only request time off | Request time off | Request time off → Or scan barcodes |
| Employee who sees project tasks | See the tasks on your jobs | See your tasks → Or scan barcodes |
| Everyone else | Start and stop your timer with a barcode | (Just the starting tile: Open Scan Barcodes) |
A step only appears if its screen is on your Home page, so someone without access to Expenses will not see an Add expenses step. What shows up is also controlled by user rights.
Hiding the Card and Bringing It Back
The card is meant to be temporary. It goes away in either of two ways:
- You dismiss it. Click Got it, do not show again or the × in its corner. Your browser remembers this for your user name, so the card stays hidden on that computer.
- Your account becomes established. The card hides itself once there is real work in the system:
- An administrator: 2 or more real projects, or 10 or more real time logs.
- An employee: 5 or more of your own time logs, or an account that is 30 days old.
- Scroll to the very bottom of the Home screen.
- Click Show Start Here.
Because dismissal is remembered by the browser, signing in from a different computer or browser can show the card again. Click Got it, do not show again there too.
The "Show More Categories" Button
While the Start here card is showing, the category cards that matter most to your role stay front and center, and the rest tuck away behind a button at the end of the grid, for example Show 8 more categories: Customers, Calendars, Charts, and 5 more. Click it to reveal everything; click Show fewer categories to tuck them away again. Nothing is removed. Once the card is hidden, the full grid is simply there as usual.

For an administrator the front-and-center categories are Project Management, Time Tracking, and Barcodes. Employees see the categories that fit their screens.
Adding Sample Data
An empty system is hard to evaluate: no Gantt chart to look at, no time logs to total, no inventory to run low. Sample data fills the system with a small, believable, fictional company so you can click through almost every major feature immediately.
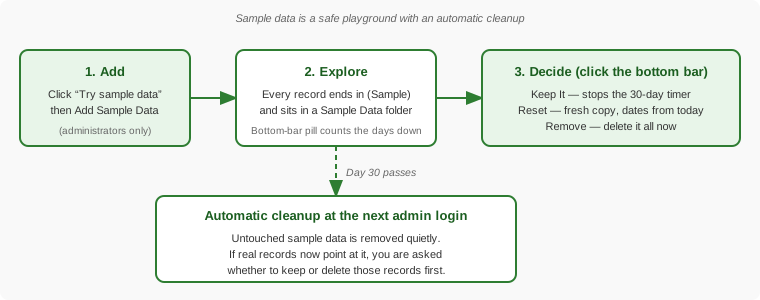
Only administrators (with the right to create jobs and projects) can add sample data.
- On the Home screen, click Try sample data in the lower-right corner of the Start here card.
- Choose who the sample work belongs to:
- Assign to my team (the default) — sample tasks, time logs, and time off requests rotate across your active users, so everyone has something to look at.
- Assign to me only — nobody else sees a sample task, time log, or request under their name.
- Click Add Sample Data.
There is nothing else to pick. Everything is installed together. No users are created or changed.
After the data is in, the same window changes to show a Where to look list with a link to each area (Project Tasks, Time logs, Invoices, Inventory, Time Off). It also tells you how many records were added and how many days remain before they are removed automatically.
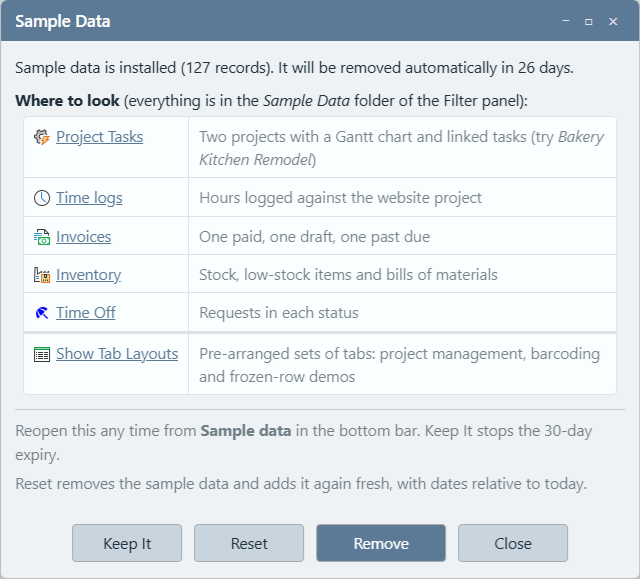
You do not have to keep the Home screen open to find this window again. A small pill in the bottom bar counts down to the automatic cleanup. Click it to reopen the window.

What Sample Data Contains
| Area | What you get |
|---|---|
| Time tracking | A Website Redesign project with subprojects, linked tasks, milestones, and about 35 time logs spread over recent weeks. Hours are realistic: weekdays only, never overlapping, and never enough to trigger overtime. A couple of logs land on today so the live work-in-process views have something to show. |
| Project planning | A Bakery Kitchen Remodel project with nested subprojects and about a dozen tasks on a Gantt chart, linked into a critical path, including a start-to-start link and a lag so the paint can cure. Progress is entered as percent complete rather than time logs. |
| Inventory and bills of materials | Nine items (hinges, drawer slides, plywood, and so on) plus cabinet assemblies built from them. Two items are deliberately low on stock so the low-stock views have something to flag. |
| Expenses | A handful of expenses with three expense types: Materials, Travel, and Software. |
| Invoices | Three invoices: one paid, one still a draft, and one past due. |
| Time off | Four time off reasons and eight future requests in each approval status. |
| Customers and categories | Three fictional clients (one with no projects, a useful empty case) and four categories. |
| Ready-made tab layouts | Pre-arranged sets of tabs for project management and barcoding, plus single-tab demos of the frozen summary rows (Gantt mini-map, upcoming tasks, work in process, low stock, and accounts-payable aging). Open them from Show Tab Layouts in the sample data window, or from the tab strip's Restore Layout and Restore Tab menus; see Dock Layouts and Saved Tabs. |
To try a ready-made layout, click Show Tab Layouts in the sample data window and pick one from the list. Choosing a layout closes your open tabs and opens that layout's collection of tabs in their place, just like restoring any Dock Layout.
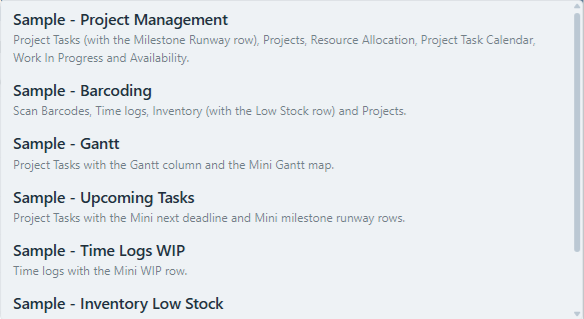
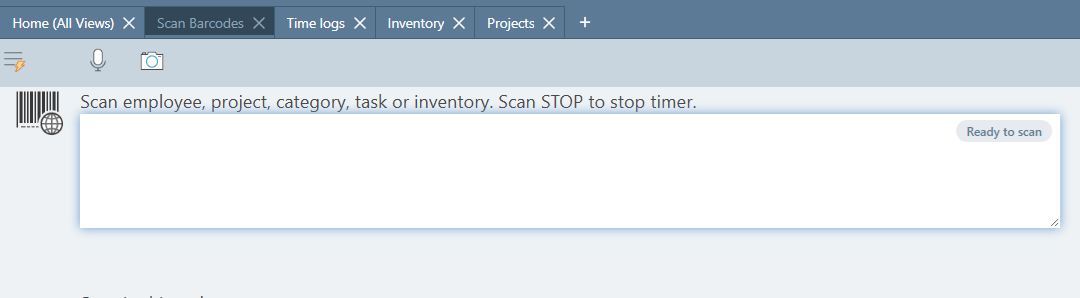
For example, choosing Sample - Barcoding opens Scan Barcodes, Time logs, Inventory, and Projects as tabs next to Home, ready for a barcode-scanning walkthrough. Home always stays open.
Dates are relative to today. The Gantt charts are laid out so the projects look in flight the day you install them, with some work finished, some under way, and a few tasks due soon or already overdue. Reset (below) re-centers them on the current day.
How Sample Data Stays Out of Your Way
Sample data is designed so it cannot be confused with, or leak into, your real records:
- Clearly labeled. Every sample record's name ends in (Sample), and records that can live in folders sit in a Sample Data folder, so it is obvious in every grid and in the Filter panel's folder tree.
- Fictional contact details. Only invented people and example.com email addresses are used, so no scheduled email or integration can reach a real person.
- Kept out of your integrations. Sample records are never sent to Zapier or webhooks, and sample time logs and expenses are pre-marked as already exported so they never appear in a QuickBooks export.
- Your invoice numbers are safe. Sample invoices use their own numbering, so your first real invoice still gets the number you expect.
- Doesn't hide the Start here card. As noted above, sample projects and logs do not count toward "established."
- Self-cleaning. It is removed automatically after 30 days unless you choose to keep it.
Keeping, Resetting, and Removing It
Once sample data exists, clicking Sample data in the bottom bar (or Try sample data on the card) opens the window with three choices instead of an Add button:
| Button | What it does |
|---|---|
| Keep It | Stops the 30-day expiry. The countdown pill in the bottom bar goes away. Use this if you want to keep it around for training new hires. |
| Reset | Removes the sample data and adds it again fresh, with dates relative to today. Handy after you have changed things around while experimenting. |
| Remove | Deletes all sample records now. |
When real records depend on sample records
Standard Time® never silently deletes something you have started using. Sample data counts as "touched" if a real record points at a sample one (for example, a real time log logged against a sample task, or a real task linked to a sample task), or if a sample record was edited well after it was created. When that is the case, Remove (and the 30-day cleanup) pauses and asks you to choose:
- Keep my records (the default) — remove only the sample records and clear the links from your records to them.
- Also delete my records that were logged against sample projects, subprojects, or tasks (time logs, expenses, tasks).
If nothing real depends on the sample data, it is simply removed with no questions asked.
The 30-day cleanup runs when an administrator signs in after the expiry date. Non-administrators never trigger it.
Tips
| Situation | What to do |
|---|---|
| Evaluating Standard Time® for the first time | Add sample data first, open the Project Management tab layout, and look at the Gantt chart, critical path, and time logs before you type in a single real job. |
| Training your team | Choose Assign to my team so every employee has their own sample tasks and hours to practice with. Click Keep It until training is done, then Remove. |
| Practicing barcode scanning | Generate barcodes for the sample projects with Generate Barcode or QR Code, then scan them following Shop Floor Barcode Scanning. |
| Don't want to see the card again | Click Got it, do not show again. The Show Start Here link at the bottom of Home brings it back. |
| Ready to go live | Click Remove so reports, exports, and dashboards show only real data. Sample records are easy to spot by their (Sample) suffix and the Sample Data folder if you want to double-check. |
- Home Screen Icons Guide — what every tile on the Home screen does
- How to Set Up Users — the "Add employees" step on the checklist
- Shop Floor Barcode Scanning — the "Scan barcodes" step
- Gantt Chart & Project Tasks — explore the sample Bakery Kitchen Remodel plan
- Saving and Restoring Dock Layouts — how the sample tab layouts work
- FAQ: Getting Started