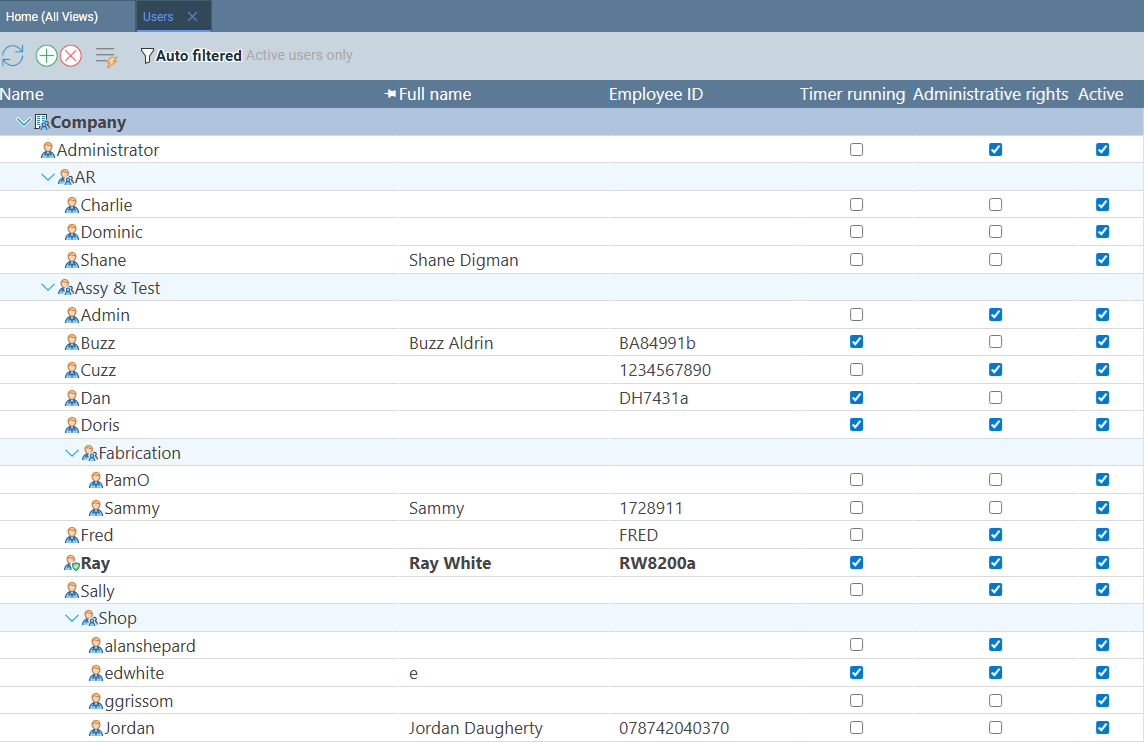
The Users Tree: Enterprise → Workgroups → Users
Standard Time® organizes employees in a three-level hierarchy. The enterprise is the top-level node — it represents your company. Under the enterprise you create workgroups that correspond to your departments, teams, or shifts. Individual users live inside those workgroups.

Workgroups are not just for display — they determine what employees see in the time entry views and make it easy to filter reports by department. You can create as many levels of nested workgroups as your org chart requires.
Creating Workgroups
A workgroup represents a department, team, or any logical grouping of employees. You create workgroups by right-clicking on any node in the tree and choosing New Workgroup. To create a top-level department, right-click on the enterprise (company) row.

- Open Home > Users.
- Right-click the top-level row (your company name — the enterprise).
- Choose New Workgroup from the context menu.
- A new workgroup row appears in the tree. Type the workgroup name (e.g., Production, Engineering).
- Press Enter or click away to save.
Nested Workgroups for Your Org Chart
You can create workgroups inside other workgroups to reflect a more detailed org chart. For example, a Production workgroup might contain sub-workgroups for Machining, Assembly, and Quality. Right-click on any existing workgroup to add a nested workgroup beneath it.
- Right-click an existing workgroup (not the enterprise).
- Choose New Workgroup from the context menu.
- The new workgroup appears as a child of the one you right-clicked.
- Name it to reflect the team or shift (e.g., Machining, Night Shift).
Nesting is unlimited — you can have as many levels as your org chart requires. In practice, one or two levels of nesting is enough for most shops: a top-level department workgroup and an optional sub-group for shifts or cost centers.
Creating Users
Users are individual employee accounts. Each user belongs to exactly one workgroup. You create a new user by right-clicking a workgroup and choosing New User, or by selecting the workgroup and clicking the green + button in the toolbar.
- Right-click the workgroup you want to add the employee to.
- Choose New User from the context menu.
- A new user row appears inside the workgroup. Type the employee's name or username.
- Fill in any other required fields in the Properties panel that opens on the right.
- Click the workgroup row to select it (so the toolbar knows where to add the new user).
- Click the green + button in the toolbar at the top of the Users page.
- A new user row is created inside the selected workgroup.
- Type the employee name and fill in the Properties panel.
Administrative Rights
After creating a user, consider whether they need Administrative rights. The Admin column in the Users grid shows a checkbox for each employee. Administrators can access all pages, change settings, create and edit projects, manage other users, and view all employees' time logs. Regular employees have access limited to their own time entry and the shop floor scan page.
Common conventions used by Standard Time® shops:
- Admin checked: Plant managers, supervisors, project managers, HR — anyone who needs to edit projects, run company-wide reports, or manage other users.
- Admin unchecked: Shop floor workers, machinists, assemblers — employees who only need to scan barcodes and view their own time logs.
- Open Home > Users.
- Locate the employee row in the tree.
- Check or uncheck the Admin checkbox directly in the grid row.
- The change takes effect immediately — no save button required.
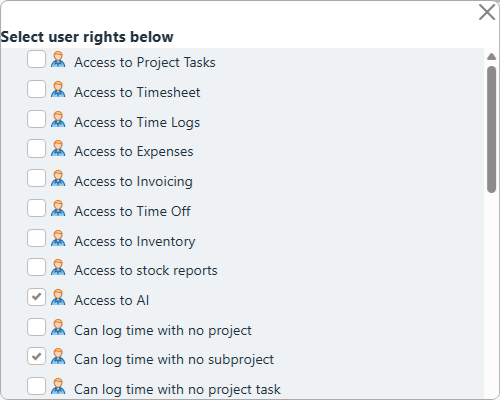
Fine-Tuning Access with User Rights
For more granular control than a simple admin on/off switch, Standard Time® provides a Rights property inside the User Experience section of each user's Properties panel. Clicking Rights opens a checkbox list where you can enable or disable specific features for that employee — independent of whether they are an administrator.
- Open Home > Users.
- Click the employee row to open the Properties panel on the right.
- Scroll down to the User Experience section.
- Click the Rights property. A popup checkbox list opens.
- Check or uncheck individual rights to control exactly what this employee can access.
- Close the popup — changes are applied immediately.
The Rights popup lets you give a non-administrator selective access to specific areas — for example, allowing a team lead to view all time logs without granting full admin access to project settings. You can also restrict an administrator's view when you want to limit visibility to specific modules.
- Shop floor worker: Rights to Scan Barcodes and their own time entry only — no project editing, no reports.
- Team lead: Rights to view Time Logs for all employees in their workgroup, plus Scan Barcodes.
- Project manager: Full admin with Rights to all project management pages, resource allocation, and Gantt charts.
- Plant manager: Full admin — all Rights checked.
Shop Floor Logins
Shop floor employees do need a Standard Time® password to log in — the same as any other user. However, once they are logged in, you can restrict what they see by removing access to areas that are not relevant to their role. See Fine-Tuning Access with User Rights above for how to open the Rights popup for each user.
For a typical shop floor worker, uncheck the following rights to strip the Home page down to just the Scan Barcodes icon:
- Access to Project Tasks
- Access to Timesheet
- Access to Time Logs
- Access to Expenses
- Access to Invoicing
- Access to stock reports
- Access to AI
With these rights removed, the employee's Home page shows only the icons they need — keeping the interface clean and reducing the chance of accidental edits to project data.
SHOPFLOOR) with the restricted rights above works well for scan stations where individual logins would slow things down.
- A unique username — matched exactly by their barcode label
- Active checked — inactive users are not recognized at the scan station
- Can log in checked — required for the scan station to accept the employee's barcode
Changing Your Password
Any user can change their own password by clicking Home > Change Password in the menu. The option is always accessible from the Home page — no admin assistance required.
Video Walkthrough
Watch this video for a complete walkthrough of setting up users and workgroups in Standard Time® — from opening the Users page to configuring admin rights and printing employee barcode labels.
Printing Barcode Labels for Employees
Every employee who works on the shop floor needs a personal barcode label — a badge or card they scan first every time they start or stop a timer at the Scan Barcodes page. The barcode encodes the employee's username exactly as it appears in Standard Time®. When scanned, it identifies the employee and begins their session.

Standard Time® can generate and print barcode labels directly from the Users page. You can print a single label or a batch for all employees at once. Labels can be printed on standard Avery label sheets, laminated badge cards, or adhesive wristbands — whatever works for your shop environment.
- Open Home > Users.
- Select the employee (or select all users to print a batch).
- Look for the Print Barcodes or label print option in the toolbar or right-click context menu.
- Choose your label format and print.
- Laminate and distribute to employees — one label per person.
JSMITH, jsmith, and JSmith will all resolve to the same employee.
Deactivating Users
When an employee leaves or changes roles, resist the urge to delete their account. Deactivating keeps the account intact so all historical time logs remain reportable — payroll audits, job costing, and warranty claims all depend on that data staying tied to the right person.
Uncheck Active
The quickest way to deactivate a user is to uncheck the Active checkbox in their Properties panel. An inactive user cannot log in to Standard Time® and will not be recognized at the Scan Barcodes station — scanning their barcode produces no result.
- Open Home > Users.
- Click the employee row to open the Properties panel.
- Uncheck the Active checkbox.
- The change takes effect immediately — no save button required.
Move Deactivated Users to an Inactive Workgroup
Unchecked Active accounts still appear in the Users tree alongside your current employees. Create an Inactive workgroup and drag deactivated employees into it to keep your active views clean. Managers only see current staff at a glance; the Inactive workgroup is always one click away when historical records are needed.
- Right-click the enterprise (top-level row) and choose New Workgroup.
- Name it Inactive.
- When an employee leaves, uncheck their Active property, then drag their row into the Inactive workgroup.
- To view former employees, expand the Inactive workgroup in the tree.
Filtering By User
The Users page includes a Filter panel — open it via View > Filter — that lets you narrow the user list by workgroup, name, active status, or other criteria. Instead of scrolling through a long tree, select a workgroup in the Filter panel to instantly show only the employees in that department. This is especially useful in larger shops where the full tree spans dozens of employees across many workgroups.
- Open Home > Users.
- Click View > Filter to open the Filter panel.
- Select a workgroup from the filter tree. The user list updates immediately to show only members of that workgroup.
- To clear the filter, click All Users or remove the selection in the Filter panel.
- Shop Floor Barcode Scanning — How It Works — complete scan workflow from username through to STOP
- How to Deactivate Projects — close out completed jobs so employees can no longer scan them
- Things to Scan on the Shop Floor — full reference of every scannable item type
- FAQ: Getting Started — installation, user counts, and setup time questions
- FAQ: Shop Floor & Time Tracking — employee rights and access control questions