Opening the BOM Editor
Any inventory item can be an assembly: give it a list of component items and it becomes a Bill of Materials. A component can be a plain part, or it can be another assembly with its own list, so a BOM can be as many levels deep as your product needs. The BOM editor is where you maintain that list and check it. To scan a finished assembly and deduct all of its parts at once, see the INV-BUILD section of the inventory scanning guide.
- Open the Inventory grid and click the assembly you want.
- In the Properties panel, find the BOM category.
- Click the Inventory items property. A panel opens with two tabs, Edit and Explode.
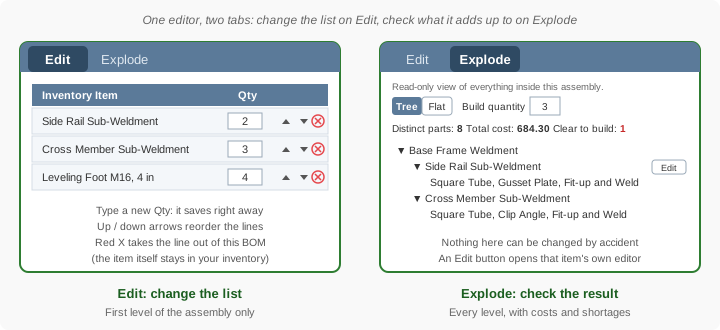
The Example Used on This Page
The screenshots here are from a small welded-frame assembly called Base Frame Weldment. One finished frame needs two Side Rail Sub-Weldments, three Cross Member Sub-Weldments, four Leveling Feet, and one Final Weld and Square operation. Each sub-weldment has its own parts underneath it, which makes this a two-level BOM with eight distinct parts altogether.
The Edit Tab: Changing the List
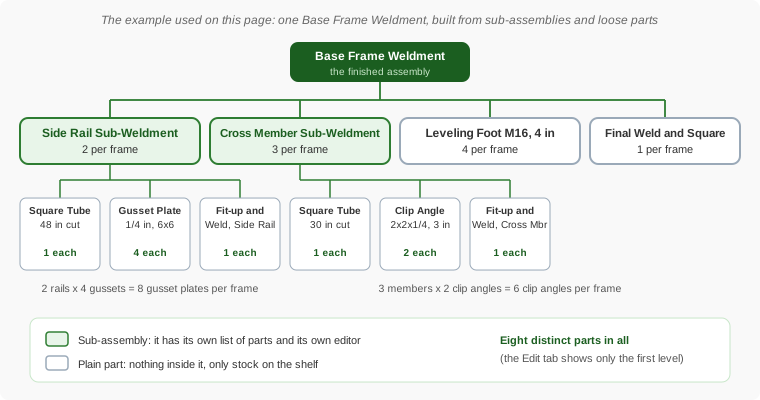
The Edit tab shows the first level of the assembly: the items that go directly into it. Each row has an item name, a Qty box, up and down arrows, and a red X.
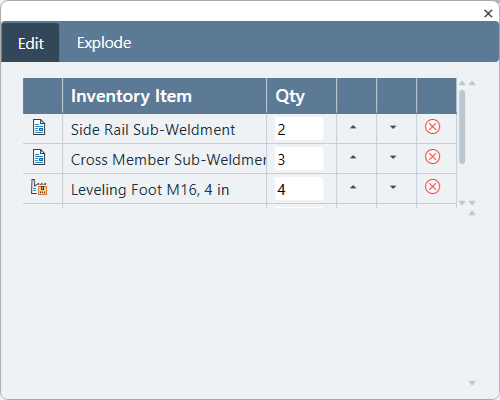
- Qty: how many of that item one finished assembly uses. Type a new number and it is saved right away. There is no Save button to remember.
- Up and down arrows: move a line earlier or later in the list. Order only affects how the list reads.
- Red X: removes the line from this BOM. The item itself is not deleted and stays in your inventory.
Because the Edit tab only shows direct members, a sub-assembly appears as a single line (“Side Rail Sub-Weldment, 2”) with no hint of the parts inside it. That is what the Explode tab is for.
The Explode Tab: Tree View
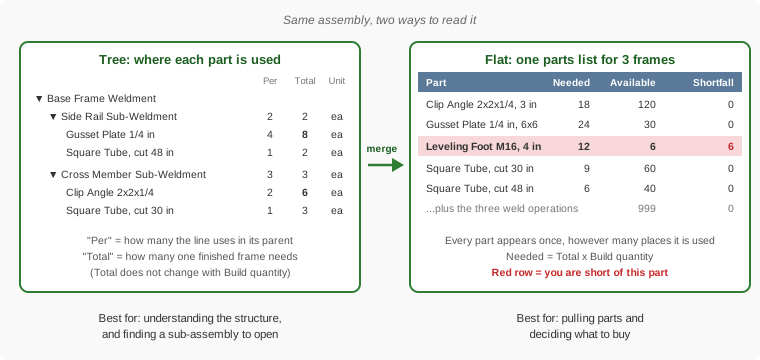
The Explode tab opens a read-only look at everything inside the assembly, however many levels deep. A banner at the top says so: “Read-only view of everything inside this assembly. To change a sub-assembly, open it.” The Tree button shows the structure the way you would sketch it, with sub-assemblies you can open and close.
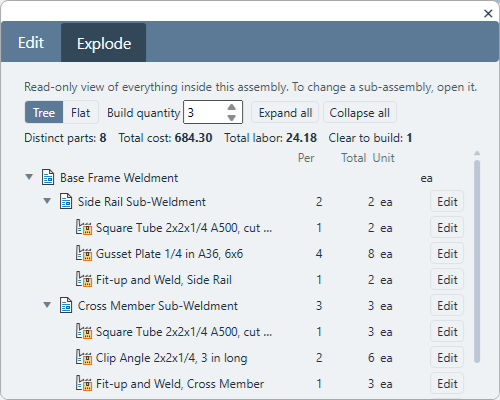
The summary line under the toolbar gives four figures for the whole assembly:
- Distinct parts: how many different plain parts are inside, counting each part once however many places it is used.
- Total cost: what those parts cost, using each item's unit cost, for the Build quantity you entered.
- Total labor: the same adding-up, using each item's labor figure.
- Clear to build: how many whole units your current stock can support. This one has its own section below.
The rows show a Per column (how many the line uses in its direct parent), a Total column (how many one finished assembly needs once the levels are multiplied together), and a Unit column. In the screenshot, one Side Rail uses 4 Gusset Plates, and a frame uses 2 Side Rails, so the Total beside Gusset Plate is 8. Total is always per one finished assembly; it does not change when you change Build quantity.
- Expand all and Collapse all open or close every sub-assembly at once. The first two levels start open.
- An Edit button on each row opens that item's own record (see Opening a Sub-Assembly).
- A small “used in N other assemblies” tag appears when the same item is also part of other assemblies. Hover over it to see their names. It is a good warning to read before you change that item.
- A “circular reference” tag means an assembly has been set up to contain itself, directly or through other assemblies. Remove that line in the Edit tab of the assembly that points back.
The Explode Tab: Flat View
Click Flat to turn the structure into a single parts list. A part used in several places, such as a bolt that appears under more than one sub-assembly, is merged into one row with the combined quantity. It is the list you would walk the stockroom with.
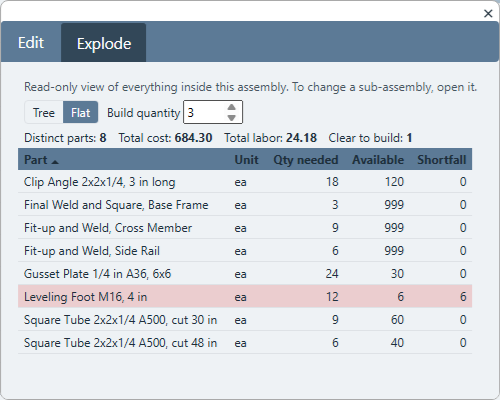
| Column | What it tells you |
|---|---|
| Part | The plain part. Sub-assemblies do not appear here, only what they are made of. Click the heading to sort. |
| Unit | How the part is counted (each, feet, pounds…). |
| Qty needed | The total of this part for the Build quantity you entered, adding every place it is used. |
| Available | What you have on hand. If an item is stocked in storage locations, the location total is used when it is larger than the item's own stock count. |
| Shortfall | How many more you would need to buy or move in. A row with a shortfall is shaded red, so shortages stand out at a glance. Click the heading to sort by shortfall. |
Build Quantity and Clear to Build
Both Explode views have a Build quantity box. It asks the question “what if I build this many?” Change it and Qty needed, Shortfall, Total cost, and Total labor update to match.
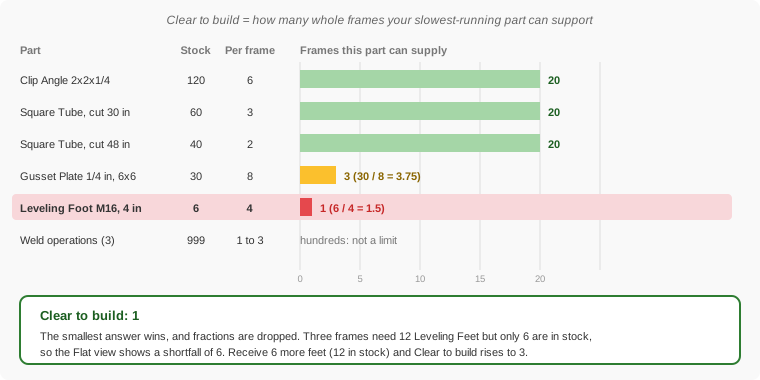
Clear to build asks a different question: “how many can I build right now?” It is the largest whole number of finished assemblies for which every part is in stock. It does not move when you change Build quantity, because it is a fact about your stock, not about the number you typed.
Reading the example
In the screenshots, the Build quantity is 3 but Clear to build is only 1. The Flat view shows why:
- Three frames need 12 Leveling Feet (4 per frame × 3). Only 6 are available, so the row is red with a shortfall of 6.
- 6 feet is enough for one and a half frames. You cannot build half a frame, so the answer rounds down to 1.
- Every other part has plenty for three frames. The Gusset Plate is the next tightest (30 on hand, 8 per frame, enough for 3). One short part holds up the whole build.
How Stock Is Counted
Clear to build is more careful than simply dividing each part's stock by its quantity. Three rules apply:
1. Finished sub-assemblies on the shelf count first
If you already have built Side Rail Sub-Weldments in stock, those are used before any new ones are made from raw parts. A frame that needs 2 side rails when you have 4 rails on the shelf is clear to build twice over without touching the tube or gusset plates. Only the part you are short is broken down into its components. The same is true of the top-level assembly: finished frames already in stock count toward the total.
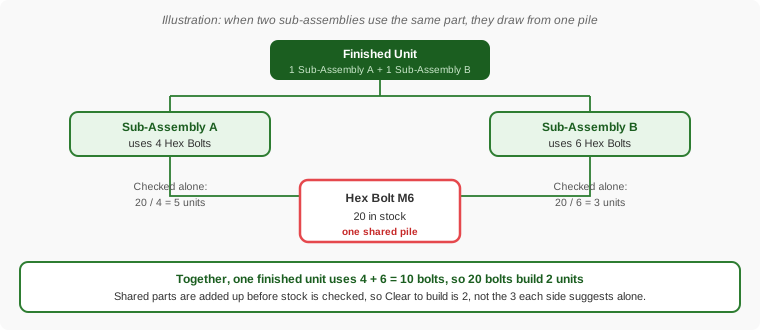
2. Shared parts are added up, not counted twice
When the same part is used in more than one sub-assembly, the builds compete for one pile of stock. Standard Time® adds up the demand before checking what is on hand, so you are never told you can build more than the shared stock allows.
3. Whole units only
Clear to build is always a whole number. It counts finished assemblies, so a fraction left over is dropped.
Opening a Sub-Assembly and Coming Back
The Explode tab is deliberately read-only, so you cannot change a sub-assembly's parts from inside the frame's view. To change one, click the Edit button on its row in the Tree view. Standard Time® moves to that item's own record in the Inventory grid and reopens the BOM editor for it, ready to edit.
- Once you have hopped to a sub-assembly, a Back to… button at the top of the editor returns you to the assembly you came from, on the same tab you left.
- After several hops, a trail of names across the top lets you jump straight back to any earlier assembly.
- If the item is not visible in the Inventory grid right now (it is filtered out, or inside a collapsed folder), you get a short message to clear the filter or expand the folder, and nothing else changes.
- Selecting some other row by hand clears the trail, so Back only appears when it makes sense.
Quantity changes you make are saved immediately, so there is nothing to lose when you move between assemblies.
Clear to Build in the Inventory Grid
The same Clear to build number is available without opening the editor. In the Properties panel's BOM category, CTB shows it for the selected assembly, and you can add the CTB column to the Inventory grid to compare every assembly side by side. The grid and the Explode tab always agree because they use the same calculation.
CTB Breakdown, just below it, is a one-line list of each component and how many units it could support on its own. It is a quick way to spot the weakest link, but because it checks each part separately it can look more optimistic than the real answer when parts are shared. For the true constraint, use the red rows on the Flat view.
Tips and Common Questions
| If you see… | It usually means |
|---|---|
| Clear to build is 0 | At least one part has none in stock. Open the Flat view with Build quantity 1 and look for the red row. A circular reference also gives 0 until it is removed. |
| Clear to build is lower than the Build quantity | That is normal: it is how many you could build today. The Shortfall column shows what to buy for the rest. |
| “This item is not a BOM” | The selected item has no component lines yet. The Explode tab shows its own stock instead. Add items on the Edit tab to make it an assembly. |
| An item named “(missing item)” | A component's record was deleted. It counts as fully short until you replace or remove that line. |
| A line with Qty 0 or blank | It needs nothing, so it never limits a build. Check the Edit tab if you expected it to count. |
| A note that the tree is truncated | A very large BOM shows only its first 5,000 rows in the Tree. The Flat list, the totals, and Clear to build still include everything. |
| Stock numbers look stale | The Explode tab rebuilds each time you switch to it, so edits on the Edit tab show up immediately. Make sure receipts and INV-ADD / INV-SUB scans are up to date, since Clear to build can only be as accurate as your stock counts. |
Clear to build tells you what you can build today. It does not place purchase orders or reserve stock for a job; Standard Time® does not have a purchasing system. When the Flat view shows a shortfall, use it as your reorder list.
- Inventory Barcode Scanning: INV-BUILD — build an assembly by scan and deduct every component at once
- Frozen Summary Rows: Low Stock — a live reorder alert pinned to the Inventory grid
- Glossary: Bill of Materials (BOM)
- FAQ: How do I see everything inside an assembly and how many I can build?