What Is a Folder?
A folder is a free-text label you attach to a project. Standard Time® uses it as a cross-cutting filter — once assigned, you can click any folder name in the Filter panel on the left side of the window and every open page narrows to show only the projects in that folder. The Projects grid, task lists, time logs, expenses, charts, reports, and dashboards all respond to the same folder selection.
Think of it as a category tag with built-in filtering power. Unlike a status field, a folder is purely organizational — it does not affect scheduling, billing, or reporting calculations. It simply groups and filters.

Finding the Folder Property
The Folder field lives in the Properties panel — the panel that slides open on the right side of the window whenever you click on a row. Here is how to find it:
- Open the Projects page (or any other page that shows projects).
- Click on any project row. The Properties panel opens on the right.
- Scroll to the bottom of the Properties panel — the Folder field is near the end of the list.
- Type a folder name directly into the field, or select one you have already created.

The Properties panel is available on every page that displays project rows. You do not need to open a separate settings screen or dialog — just click the row, scroll the panel, and type the folder name.
Creating and Assigning Folders
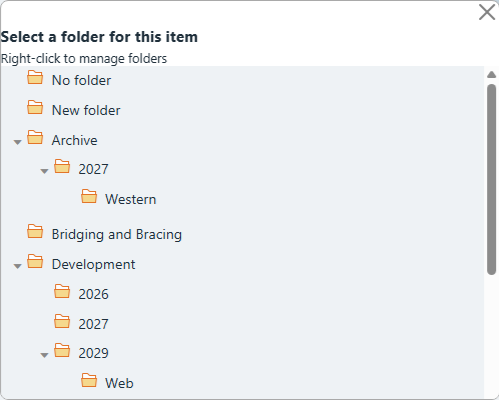
There is no separate screen for creating folders. You create a folder simply by typing its name into the Folder field on any project. Standard Time® treats that name as a folder from that point forward — it appears in the Filter panel immediately. Alternatively, click New folder in the folder creation and chooser popup.
Common folder naming conventions used on shop floors:
- By client — one folder per customer account (e.g. Apex Corp, DefTech LLC)
- By department — match your internal structure (e.g. Fabrication, Assembly, QA)
- By job type — group repeat work (e.g. Maintenance, Production Runs, Prototypes)
- By contract or program — match the billing agreement (e.g. Contract 2024-A, Program Titan)
To assign a folder to multiple projects quickly, click each project row in turn, scroll the Properties panel to Folder, and enter the same name. Because the name is free text, it autocompletes after the first few characters once a folder exists.

Filtering by Folder
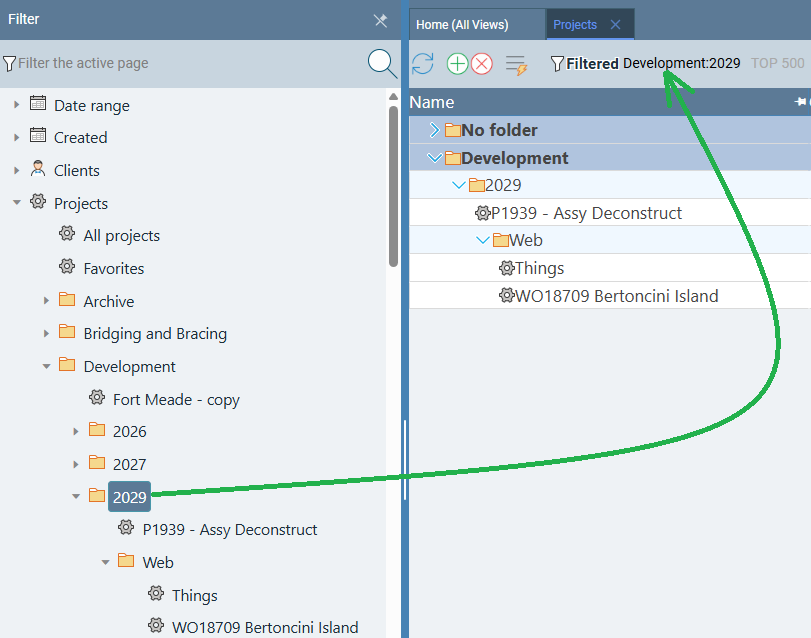
Once projects have folders assigned, the Filter panel on the left side of the window lists every folder you created. Clicking a folder name filters the current view — and every other open page — to show only the projects in that folder.
- Open the Filter panel on the left side of the window.
- Expand the Projects section inside the Filter panel.
- Look for the folder names you created. They are listed under Projects.
- Click any folder name. The current page updates immediately to show only matching projects.
The filter applies application-wide. Navigate to the Time Logs page, the Project Tasks page, or Resource Allocation — the folder selection follows you. Every page shows data scoped to that folder until you clear the filter.
Pages That Support Folder Filtering
The folder filter is not limited to the Projects page. Every page in Standard Time® that can be scoped to a project responds to the folder filter. That means a single click in the Filter panel narrows all of the following at once:

- Projects
- Project Tasks
- Time Logs
- Expenses
- Calendars
- Charts
- Reports
- Resource Allocation
- WIP Dashboard
- Gantt Chart
- Billing
This cross-page filtering is what makes folders genuinely powerful. You do not have to re-apply a filter on each page. Set the folder once in the Filter panel and navigate freely — every page stays scoped to the same folder.
Why Folders Matter
Standard Time® can hold hundreds or thousands of projects over time. Without a way to slice that list, finding the active jobs for a single client or a specific production program means scrolling through everything. Folders solve that at the organizational level — not by hiding old data, but by letting you surface exactly what you need right now.
A few practical examples:
- Client review meeting — put that client's folder in the Filter panel before the meeting. Every page shows only their work orders, time logs, and expenses for the duration of the call.
- Department billing — filter by the department folder when running billing reports. The report scope matches the filter automatically.
- Sprint or program focus — assign a contract or program folder to all related projects. Engineers see only their assigned program's tasks without distractions from other work.
- Year-end archiving — create a folder named Archive 2024, reassign completed projects to it, and clear them from everyday views without deleting any data.
Folders are a zero-overhead categorization tool — no extra configuration, no separate screen, no hierarchy to maintain. Type a name, assign it, and the filter is ready to use.
Project Templates and Folders
Folders are especially useful for managing project templates — pre-built projects you duplicate whenever a new job of that type comes in. Without a folder, templates sit mixed in with active work orders, making them easy to overlook or accidentally modify. A dedicated Templates folder separates them cleanly.
A simple setup: create a folder named Templates and assign every template project to it. When you need to start a new job, filter by the Templates folder, find the right template, duplicate it, and rename the copy. The original stays in the Templates folder untouched for next time.
- Open any template project row and set its Folder property to Templates in the Properties panel.
- Repeat for every template project in your account.
- When you need to start a new job, open the Filter panel and click the Templates folder.
- Find the right template in the filtered Projects grid.
- Duplicate it (right-click → Duplicate, or use the project menu) and rename the copy for the new job.
- Assign the new project to the appropriate client or job-type folder — leaving the original in Templates.
If you have many template types, nested folders keep them organized. Use a naming convention like Templates\Aerospace, Templates\Maintenance, and Templates\Prototypes to subcategorize. The Filter panel shows nested folders under their parent, so you can drill straight to the template category you need.
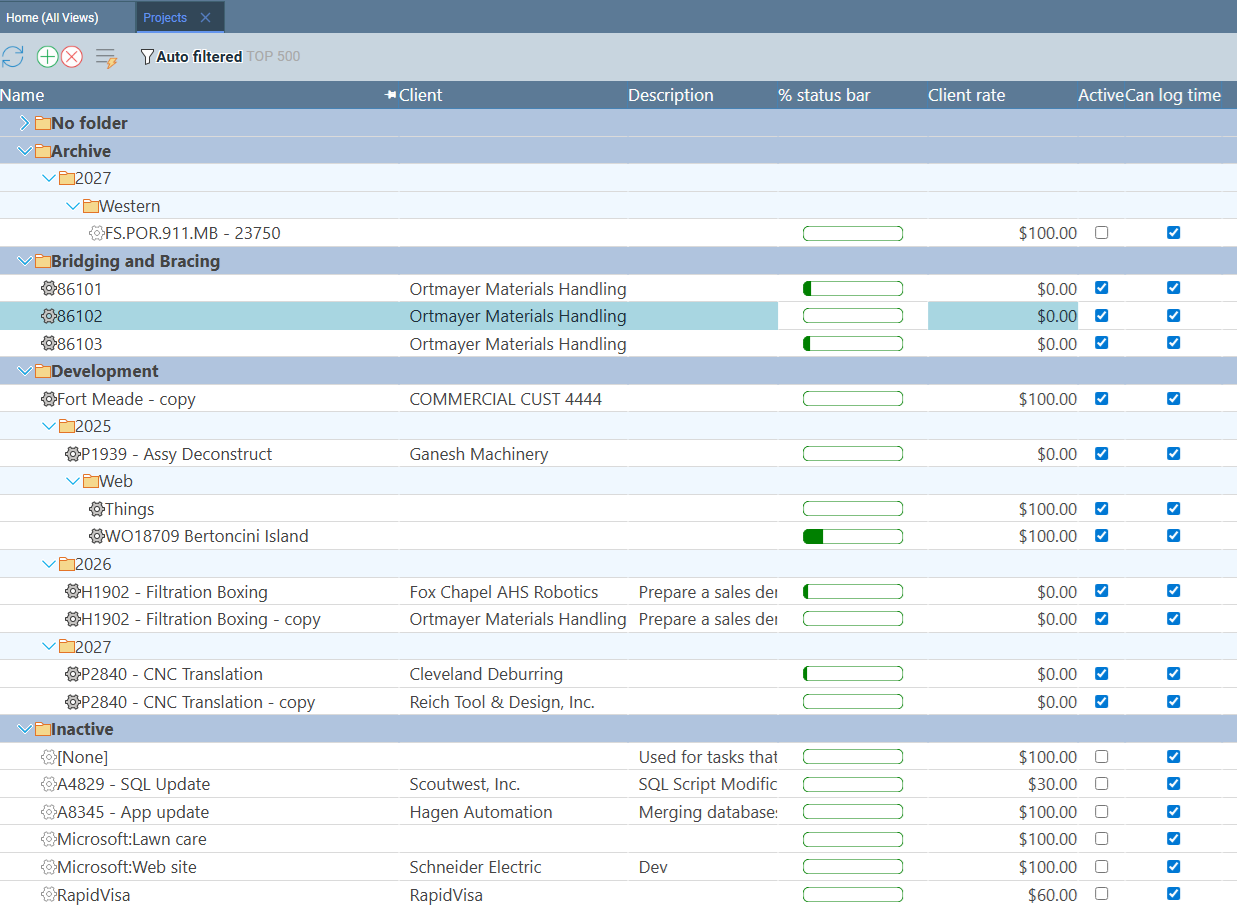
Inactive Projects
Completed jobs have a way of accumulating. After months of production work, your Projects grid can fill up with closed-out work orders that have nothing left to track — yet they keep appearing in every view alongside your active jobs. The combination of the Active flag and an Inactive folder solves this cleanly.
The process has two steps: uncheck the Active property on the project, then move it to an Inactive folder. Either step alone is useful, but together they give you precise control — the Active flag tells Standard Time® the job is closed, and the folder lets you filter it out of view without deleting any history.
- Click the completed project row to open the Properties panel.
- Uncheck the Active checkbox in the Properties panel.
- Scroll to the Folder field and set it to Inactive (type the name the first time; it autocompletes after that).
- Repeat for each closed-out job.
- When your Projects grid feels cluttered, open the Filter panel and click any active client or job-type folder — your inactive projects will not appear.
Nothing is deleted. All time logs, expenses, and task history remain fully intact and reportable. The projects simply stop consuming screen real estate in everyday views. If you ever need to review a closed job — for a warranty claim, a billing audit, or a repeat order — open the Filter panel, click the Inactive folder, and everything is right there.
Inventory Folders
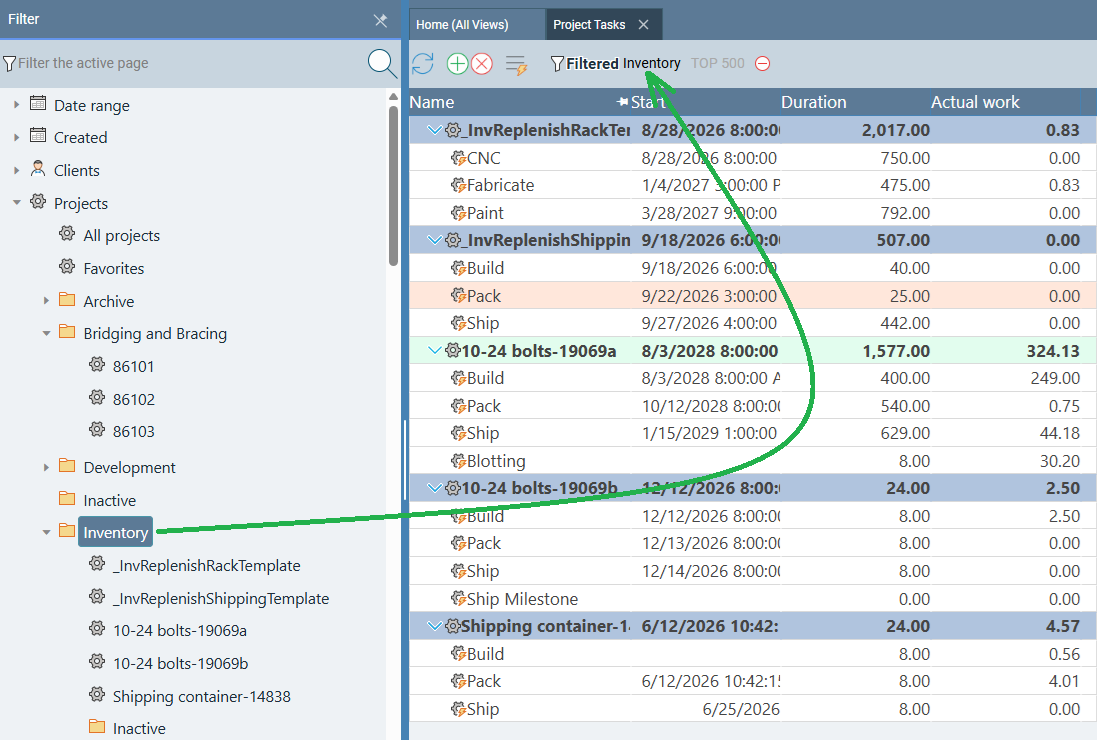
Folders are not just for projects. Every inventory item and Bill of Materials (BOM) in Standard Time® also has a Folder property. As your parts list grows, a flat unorganized inventory becomes hard to navigate — folders give you a way to slice that list by purpose, material type, supplier, or physical storage location.
Assigning a folder to an inventory item works exactly the same way as with projects: click the item row, open the Properties panel, and set the Folder field. Once assigned, the Filter panel on the left side of the Inventory page lists every folder you have created. Click a folder to narrow the grid to only the items in that category.
Common inventory folder strategies:
- By location — match your warehouse layout (e.g. Warehouse A, Bin 12, Cold Storage)
- By material type — group related raw materials (e.g. Fasteners, Sheet Metal, Hydraulic Fittings)
- By usage — tie parts to the jobs that consume them (e.g. Aerospace, Maintenance Supplies, Finished Goods)
- By supplier — see everything sourced from a single vendor at a glance (e.g. McMaster-Carr, Grainger)
Folders can be nested, which gives you the flexibility to build deep category trees that match your actual inventory structure. For example, a top-level Raw Materials folder might contain nested folders for Raw Materials\Steel, Raw Materials\Aluminum, and Raw Materials\Plastics. Clicking the top-level folder shows everything underneath it; clicking a nested folder narrows further to just that subcategory.
The List Goes On
Projects and inventory are the most common places to reach for folders, but they are far from the only ones. Folders show up across Standard Time® wherever there is a list long enough to benefit from categorization. A few more areas worth knowing:
- Invoices — assign folders to invoices to group them by billing cycle, client, or contract. Filtering the invoice list by folder makes month-end billing reviews and client-specific audits much faster when you have a high volume of invoices to work through.
- Tool Control — if you track tools and equipment in Standard Time®, folders let you organize them by type, department, or storage location. Filter to see only the cutting tools in Bay 3, or all calibration equipment due for inspection this quarter.
- Resource Allocation — the Resource Allocation board responds to the folder filter just like the Projects page. Scope the board to a single client or department folder and you see only the resources and scheduled work that belong to that group — useful for capacity planning meetings where the full schedule would be overwhelming.
- WIP Dashboard — filter the WIP board by folder to focus a screen on one production program or customer at a time. This is particularly valuable for large-screen shop floor displays where you want operators to see only the work in progress for their area.
- Reporting — most reports in Standard Time® respect the active folder filter. Scope a report to a folder before running it and the output contains only the records in that category — no manual filtering of the results required afterward.
- Holidays — group holiday schedules into folders by region, shift, or employment type. Filtering by folder makes it easy to manage separate holiday calendars for different teams or facilities without them bleeding into each other.
- Scripts — if you use automation scripts in Standard Time®, folders keep them organized by function or trigger type (e.g. Reorder Scripts, Notification Scripts, Barcode Scripts). Filter to the script category you are working on and the list stays manageable even as your library grows.