What This Integration Does
The Google Sheets integration connects Standard Time® to your Google Drive so your shop floor data can move in both directions. Any view you can see in Standard Time® can be exported to a live Google Sheets spreadsheet — and data from any Google Sheets spreadsheet can be imported back into Standard Time® to create or update records.
Send any visible grid — timesheets, project tasks, job cost reports, resource allocations — to Google Sheets with one click. Row colors, bold, and italic formatting come across exactly as displayed. A new browser tab opens with the finished spreadsheet.
Paste a Google Sheets URL, pick a sheet tab, choose the record type (projects, tasks, time entries, users, etc.), and Standard Time® reads the rows and creates records. Use this to migrate data from an existing spreadsheet or feed data from another system.
Authentication Types
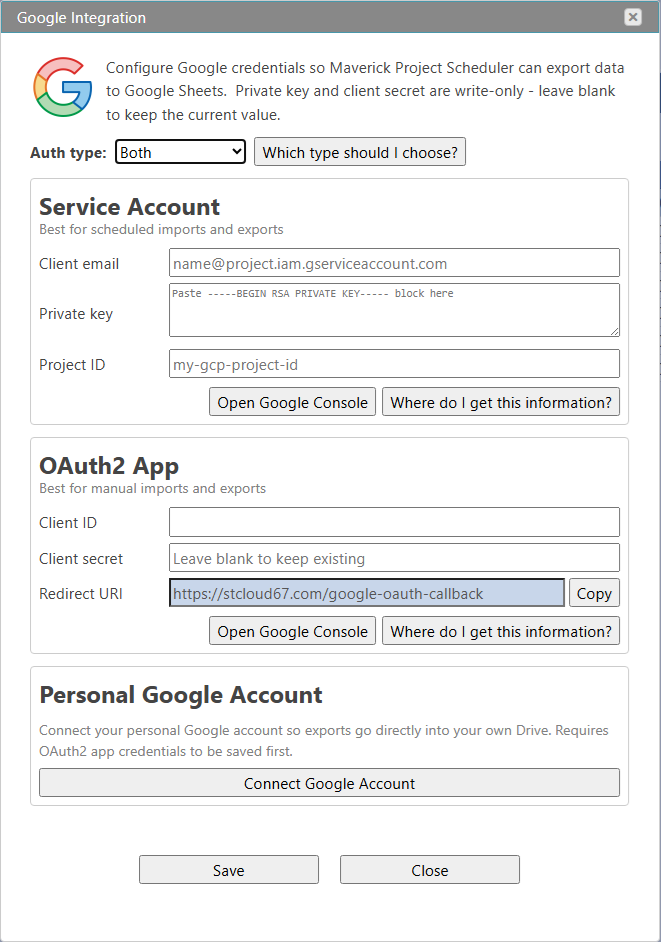
Standard Time® supports three ways to authenticate with Google. You choose the auth type in Tools → Google Integration. The right choice depends on whether you want a single shared identity for the whole company or individual sign-in per employee.

Service Account
A service account is a special Google identity that Standard Time® uses on behalf of your whole organization. An administrator downloads a JSON key file from Google Cloud Console and pastes the three values it contains (client email, private key, project ID) into Standard Time®. After that, no individual user needs to sign in to Google — when any user exports a sheet, the service account creates it and automatically shares it with that user's email address so it appears in their Google Drive.
OAuth2 (Per-User)
With OAuth2, an administrator registers a web application in Google Cloud Console and enters the Client ID, Client Secret, and Redirect URI into Standard Time®. Each employee then clicks Connect Google Account in Tools → Google Integration once to complete a standard Google sign-in. After that, that user's exports go directly into their own Google Drive under their own identity — no sharing step is needed because the employee owns the file.
Both
When both credential sets are configured, Standard Time® uses each employee's personal OAuth2 tokens when available, and falls back to the service account for employees who have not yet connected their Google account. This is the most flexible option for larger teams where adoption is gradual.
| Auth Type | Who Owns the Sheet | Per-User Sign-In | Best For |
|---|---|---|---|
| Service Account | Service account — shared with user email | No | Simple setup, automation, Workspace policy restrictions |
| OAuth2 | The individual employee | Yes (one time) | Employees want exports in their own Drive |
| Both | Employee if connected; service acct fallback | Optional | Mixed teams, gradual rollout |
Exporting to Google Sheets
The export command is available from the File → Export → Google Sheets menu in any view. When you choose it, Standard Time® reads the currently visible grid — all columns, all rows, with active filters and sort order — and sends that data to the Google Sheets API.

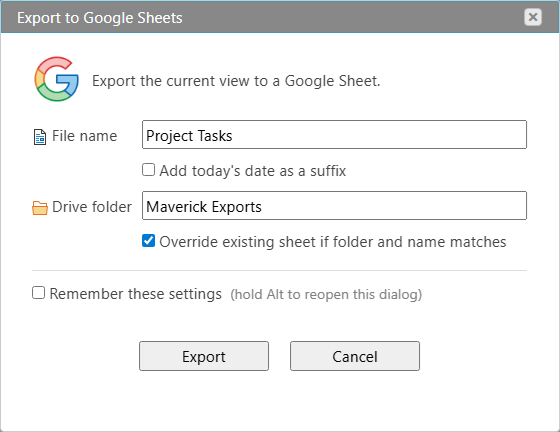
Export Dialog Options
The first time you export (or any time you hold Alt while clicking the command), the export dialog appears. After you check Remember these settings, subsequent exports skip the dialog and run immediately with your saved preferences.
| Option | What It Does |
|---|---|
| Sheet Name | The name of the Google Sheets spreadsheet to create. Defaults to the current view title. |
| Add Date Suffix | Appends today's date to the sheet name (e.g. "Timesheet 2026-06-05"). Useful for archiving exports over time. |
| Drive Folder | The Google Drive folder path to save the sheet in. Standard Time® creates the folder if it doesn't exist. Default: "Standard Time Exports". Leave blank for Drive root. Nested paths like "Clients/Acme" are supported. |
| Override Existing | When checked and a sheet with the same name already exists in the folder, the existing sheet's data is cleared and replaced. When unchecked, a new sheet is always created. |
| Remember Settings | Saves all dialog values to local storage. Future exports skip this dialog. Hold Alt to force it open again. |
What Gets Exported
Standard Time® exports only the columns that are visible in the current view — hidden or metadata columns are skipped. The first row of the spreadsheet is a header row derived from the column names. Row-level formatting is preserved:
- Background color — summary rows, phase headers, and color-coded jobs carry their colors into Sheets.
- Bold and italic — section headers and emphasized rows appear bold or italic in the spreadsheet.
- Text color — custom text colors applied to rows in Standard Time® are preserved.
- Left-alignment — the Name column is always left-aligned regardless of column defaults in Sheets.
DateTime values export as yyyy-MM-dd HH:mm:ss strings. Numeric values (integers, decimals, durations) export as numbers so Sheets formulas work on them directly.
Importing from Google Sheets
The import command is available from File → Import → Google Sheets. You provide the URL or spreadsheet ID of any Google Sheets document, select a sheet tab, choose the type of record to create, and Standard Time® reads the rows and imports them.

Import Dialog
Paste either a full Google Sheets URL (copied from the browser address bar) or a bare spreadsheet ID into the URL field, then click Load. Standard Time® fetches the list of sheet tabs from the spreadsheet and populates the tab dropdown. Select the tab that contains your data, choose the record type, and click Import.
The dialog remembers the last URL you imported from. If a URL is already in the field when the dialog opens, the tab list is loaded automatically so the dialog is ready to use immediately.
Row 1 of the selected sheet tab is always treated as the header row. Column names in the header row must match the field names Standard Time® expects for the chosen record type. Empty rows are skipped automatically. The import result is shown as a toast message with a count of records created or updated.
Setup Steps
Setup takes about ten minutes for Service Account or about fifteen for OAuth2. You need administrator access in Standard Time® and access to Google Cloud Console.
Step 1 — Create a Google Cloud Project
- Go to console.cloud.google.com and sign in with your Google account.
- Click the project selector at the top and choose New Project. Give it a name (e.g. "Standard Time Integration") and click Create.
- With the new project selected, go to APIs & Services → Library.
- Search for Google Sheets API and click Enable.
- Search for Google Drive API and click Enable.
Step 2 — Create Credentials
Follow the path that matches your chosen auth type:
- Go to IAM & Admin → Service Accounts.
- Click Create Service Account. Give it a name and click Done.
- Click the service account row, then open the Keys tab.
- Click Add Key → Create New Key, choose JSON, and click Create. The file downloads automatically.
- Open the JSON file and locate the
client_email,private_key, andproject_idvalues. You will paste these into Standard Time®.
- Go to APIs & Services → OAuth consent screen. Choose External (or Internal for Google Workspace).
- Fill in the app name and support email. Add the scopes
.../auth/spreadsheetsand.../auth/drive.file. Save. - Go to APIs & Services → Credentials and click Create Credentials → OAuth client ID.
- Choose Web application as the type.
- Under Authorized redirect URIs, add the Redirect URI shown in Standard Time® at Tools → Google Integration.
- Click Create. Copy the Client ID and Client Secret.
Step 3 — Configure Standard Time®
-
Open the Google Integration dialog.
In Standard Time®, go to Tools → Google Integration. The configuration dialog opens. -
Choose the Auth Type.
Select Service Account, OAuth2, or Both from the dropdown. The dialog shows only the fields relevant to your chosen type.
-
Paste your credentials and click Save.
For Service Account: enter the client email, paste the full private key block (beginning with-----BEGIN RSA PRIVATE KEY-----), and enter the project ID. The private key is write-only — Standard Time® confirms it is stored without ever returning it.
For OAuth2: enter the Client ID and Client Secret. The Redirect URI is shown read-only — copy it into Google Cloud Console under Authorized redirect URIs before saving. -
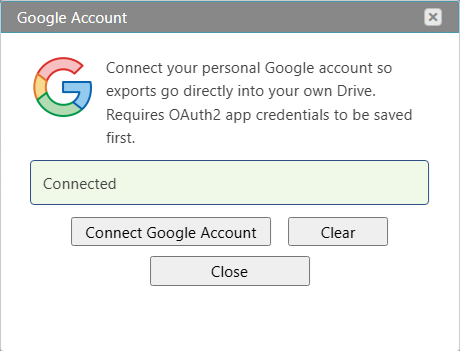
(OAuth2 only) Connect each employee's Google account.
After saving OAuth2 credentials, click Connect Google Account — or have each employee open Tools → Google Integration and click the button themselves. A 600×700 popup opens Google's consent page. After the employee approves access, the popup closes automatically and their tokens are stored. -
Test the export.
Open any project tasks grid or timesheet in Standard Time®, then click File → Export → Google Sheets. Enter a sheet name and click Export. A new browser tab should open showing your data in Google Sheets within a few seconds.
Back to Integrations